AirMax 2009High Performance Pneumatic Marble Accelerator
26 Jan 2009
Introduction
This page briefly documents the design and construction of a high-performance compressed air marble gun. The project was entirely conceived by Woo Han, a friend who had worked with me on previous pneumatic accelerators before. In late December 2009, he gave me a call about this new project he was embarking on. It wouldn't be too complicated, but he had some clear goals in mind, and wondered if I was keen to provide some input for his project. While almost all the work has been done by himself, I'll put up this page just to document the process and to record the results.
Design
These were the few design goals that we set out to acheive:
-
Breech Loading
-
Uses a normal glass marble as a projectile
-
Easy and simple to use
-
Portable
-
Powerful (~200m/s muzzle velocity max)
-
Accurate (most important goal) to at least 20m
-
Elementary sight for aiming
-
Trigger mechanism
As you can see, the project is not particularly simple (vs. Air Cannon TFI), but doable with a few afternoons of work and testing. Note that this cannot be considered a rifle as the barrel is not rifled. The name AirMax was given by Woo Han.
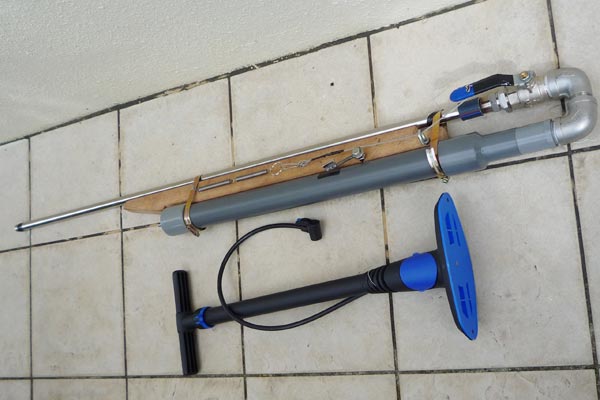
Initial Setup of Airmax2009
Construction
Construction of the main air-chamber, barrel and valve are straightforward. The only more complicated mechanism was the triggering and the breech loader. The entire setup was built using 1" Stainless Steel pipe fittings and 1.5" VP Pressure rated PVC pipe. This is a schematic of the setup, including the trigger mechanism.
Description & Details
Air is pumped via a tyre-valve into a 1.5" 50cm PVC air-chamber. This tapers via a reducer fitting to 1" pipes to two 90 degree stainless steel pipe elbows to a 1" brass ball valve. The other end of the valve is attached to a 1" double threaded pipe fitting, which has a 1.2m long stainless steel pipe welded on. This forms the basis for the entire air gun. The stainless steel pipe was carefully chosen to accept standard marbles as fitting as possible. All threads were fitted with Teflon tape and PVC glued together with industrial PVC glue. Wood blocks were inserted between the barrel and air-tank, and then secured using metal pipe fasteners. An attempt was made to build a butt for the rifle, but it turned out too difficult due to lack of equipment. Perhaps a butt will be made once the setup is optimized.
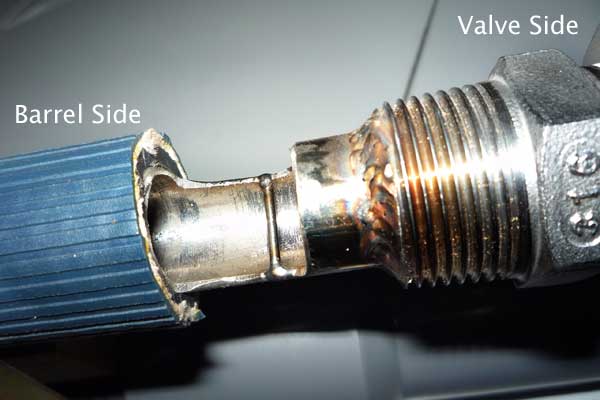
Muzzle-loading was not a good option because the long barrel would require a troublesome ram-rod to insert the projectile in. In order to build a breech loader, Woo Han ingeniously came up with the idea of a side-loader similar to the valve of a bunsen burner. A hole was cut at the side of the stainless steel pipe and a small rod was welded near the valve-end to prevent the projectile from rolling towards and into the valve. In order to cover the hole, a stiff pressure-rated rubber hose section was inserted over the hold and made a good seal. With a slight application of oil, the tight-fitting rubber hose could be slid back and forth to cover and uncover the hole, which the marble can then be inserted. Woo Han managed to fix this up with the help of his uncle's workshop which has equipment and personnel well skilled in TIG welding. :)
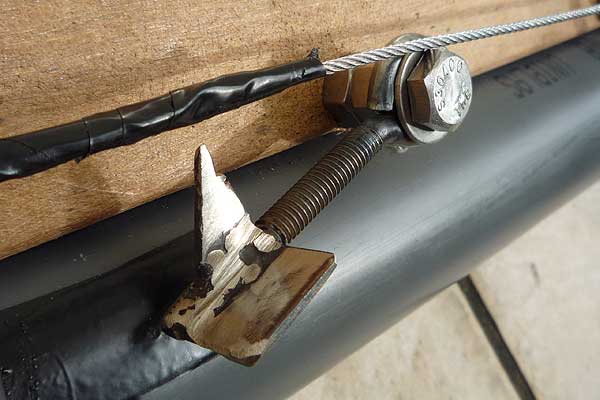
A few trigger mechanisms were discussed. Due to lack of resources, time and equipment, we eventually settled on version one of the trigger mechanism. In order to open the valve quickly with just a finger touch, we had to find some way to open the ball valve via the lever. This was done using a wire pulling on the valve lever by two stretched springs. A metal catch was fabricated to hold the tensioned springs in place. When the trigger is depressed with a thumb, the spring hook slides off the catch, pulling the wire through a metal hook which opens the valve. This catch was fabricated via stainless steel plates and a steel eye-bolt at Woo Han's aunt's workshop.
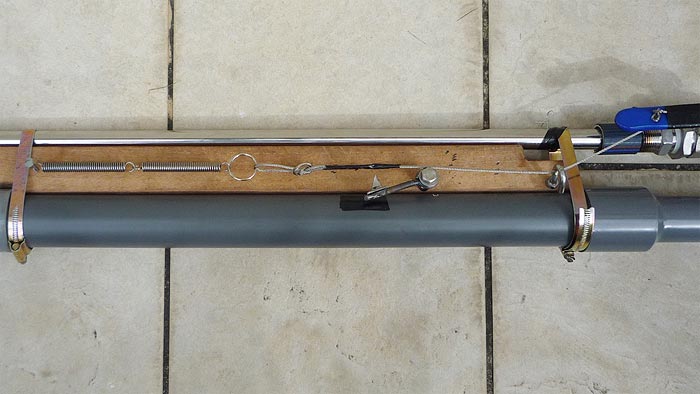
Above is the simple triggering setup as seen from the left side. Note the two springs (40c each!) which are hooked onto a key-ring, which is tied to steel wire. This is pulled through a hook which allows the wire to pull the lever at an angle, increasing the torque and hopefully the speed at which the valve is opened. To operate, the lever is pulled up. This caused the spring to stretch. The trigger hooks onto the key-ring, and the valve is armed. The projectile can then be loaded via the breech. Once aim is taken, the trigger is depressed to open the valve. The setup works well, but not without some problems:
- There is a fair amount of friction between the hook and the wire. A pulley would work better in this case
- The trigger hook requires a fair bit of force to trigger
- Triggering is slightly inconsistent
- Springs are not strong enough, and the valve takes a while to open
Nonetheless, with some additional parts, the trigger should be able to work better.
A rudimentary sight was made using some twisted wire and tape. However, it worked remarkably well after some calibration.
Problems
As with all quick-and-rudimentary projects, there are bound to be some problems, which are good for us to learn from Here are some points we have noted and will likely try to improve in the near future:
- Valve opening time is too long, possibly requires stronger trigger springs
- Moving metal wire is actually filing the still hook used as a pulley. A real pulley will have to be used eventually
- Triggering mechanism simple but difficult to release consistently and lightly
- No proper sight leads to inaccuracy
- Slight leaks at high pressure due to poor Teflon-taping
- Trigger placed at wrong side of the device
- Lack of shoulder rest makes it inaccurate and awkward to operate
- Breech loader very useful, but possibility of air escaping and loosening of rubber hose after time
- Tissue paper stuffed around marble leads to inconsistent projectile velocities
- Inability to rifle the barrel will lead to inconsistent projectile trajectories
More testing and repair will result in a more refined product.
24th December 2009
Projectiles

As one of the goals of the project, Woo Han had decided that the projectile would be cheaply available glass marbles. They are very cheap and you could buy a bag of fifty for a dollar or two. Although different marbles made by different manufacturers can be of different diameters, they are almost always 1.5cm in diameter. The barrel was specifically chosen for the most common marble size. In order for a good fit, one layer of tissue paper is wrapped at the side of the marble to provide a sung fit, and to prevent it from rolling down when the barrel is sloping downwards.
Results

The limiting factor of the accelerator is the PVC air-chamber, which is rated to 284 PSI. But due to lack of compressors, it is believed that the pressure will not exceed 120PSI (which is about the maximum achievable with most bicycle air-pumps. This also maintains a large safety margin. However, even at relatively low pressures (10-30psi), the projectile is moving at significant velocity, and can cause substantial damage to anything it impacts. On the right shows Woo Han examining the device before initial testing. Despite it's size and poor design, it is actually reasonably ok to hold.
Power Firing
We had obtained a 1/2" thick plywood board and were trying to achieve enough penetration power to punch a hole through the board. However, we only had a bicycle pump which had no pressure gauge. We pumped the air chamber 80 pumps (as much as we could before it got difficult to pump), before firing it. It made a very nice hemispherical dent in the board, about halfway through, but failed to make it through the board.
The impact was severe enough to cause significant "spalling" on the other size three inches in diameter. It is clear that either more pressure is required or the whole device to be made more efficient. We are unable to characterize the test due to lack of measuring equipment.
Accuracy Testing
One of the goals was to make a reliable accurate marble accelerator, and the device was first calibrated by taping small wire loops at the rear and front of the barrel as a makeshift sight. After zeroing, it was apparent that the device was quite accurate. The limiting factor seemed to be the inconsistent triggering. Indeed at merely 15 pumps and a range of 7 metres, it was possible to obtain relatively consistent shots in a 10 by 10cm square. At that distance, the marble had enough energy to penetrate the front of a shoe box cleanly, as well as a few sheets of newspapers.
We were unfortunately unable to conduct any projectile velocity measurements yet, but there are plans for a ballistic pendulum setup in the future.
Physics
I did a simple kinematical calculation in the AirCannonTFI page, and will not repeat everything here. After making a simple Excel file for calculations, we can see some of the estimated projectile kinetic energies with the following parameters. Of course this is a theoretical approximation and will no means be completely accurate. However, it will provide a good estimate of the performance of the air accelerator.
Projectile Diameter: 1.5cm
Projectile Mass: 4.42g (calculated)
Effective Barrel Length: 110cm
Effective Air Chamber Length: 60cm
Air Chamber Diameter: 1.5 inches
5psi - 52m/s
10 psi - 73.5m/s
15psi - 90.1m/s
20psi - 104m/s
25psi - 116m/s
30psi - 127m/s
40psi - 147m/s
50psi - 164m/s
60psi - 180m/s
70psi - 194m/s |
80psi - 208m/s
90psi - 220m/s
100psi - 232m/s
110psi - 244m/s
120psi - 254m/s
130psi - 265m/s
143psi - 1001km/hr
167psi - 300m/s
205psi - 333m/s
280psi - 389m/s |
Of course this does not work out in real life, due to things like non-instantaneous valve opening, imperfect projectile-barrel fit, projectile-barrel friction,
Nonetheless, it seems that the 200m/s goal could possibly be achieved below 120psi. Also, as we can see from the calculations, the projectile speed at just 20psi is astounding, and sufficient for accuracy at 20m.
More to come soon!
Back to main page
(c) Gao Guangyan 2011
Contact: loneoceans [at] gmail [dot] com |

