Pneumatic Air Cannon TFI
The First Inch - a 1" diameter air cannon
30 Nov 2003
Introduction
This project will demonstrate how affective compressed air is in accelerating projectiles to high kinetic energies. I will construct a pneumatic air cannon which will accelerate relatively large projectiles using only PVC components and a metal ball valve. Construction methods will be described, as well as testing, firing, and results. This page will also include the theory part to find out the maximum theoretical speeds and kinetic energies possible, and a high-speed photography analysis as well.
What are pneumatic air cannons:
An air cannon, or pneumatic cannon, is usually a large bore device that uses air pressure to propel an object. You might have heard of spud guns, or combustion guns - these are different. They are pipe cannon devices, using hair spray, ether, or other volatile, flammable propellants, which is ignited by a spark causing rapid expansion propelling the projectile out. Pneumatic variants are usually more powerful and more predictable as exact PSI measurements can be taken and controlled, and higher PSI levels ( more than 100psi ) can be achieved (compared to 20 - 40psi for combustion type guns), yielding more power.
Construction
TFI, short form for The First Inch, is my pneumatic air cannon. As the name implies, this cannon has a 1 inch diameter barrel and is my first pneumatic linear accelerator. This accelerator will be used to accelerate objects to high velocities for experiments.
Construction
For this project, I will be using PVC components, which are commonly used for plumbing. PVC is relatively cheap, light weight (1/6 the weight of steel), easy to obtain, and are available in many different sizes, making it an ideal construction material. All PVC pipes have a pressure rating, or a 'schedule' number. For this project, there are high pressures involved, and only high pressure rated PVC pipes MUST be used. Normal PVC pipes should Never be used even if you think it is the same! Normal DWV (drain waste vent) / SWV (soil waste vent) pipes allow less pipe length to slide in the fittings, is more brittle, and WILL blow up in your hands sending PVC shrapnel flying into your eyes and body.
Good pipes would be Schedule 40, 80 or 120 pipes. Compare them to normal PVC pipes and you will see the difference. The pipe walls are Much thicker and they are made to withstand high pressures. Pressure rated fittings should also be used. Always use the best heavy duty PVC glue / cement / gum to connect the fittings together. While gluing/cementing the PVC components together, prime all around the connecting sides with a PVC primer or cleaner to remove chemical contaminates like grease, then apply a generous amount of PVC cement so it covers the entire area. Slide the components together and hold it for 10 - 30 seconds other wise they will slide apart. Always let the glue to cure for 24 hours before pressurizing. Note that PVC becomes brittle at cold temperatures (0'c) and try not to expose PVC to too much sunlight. Finally, great care must be taken when operating a device such as this because their kinetic energy output can be higher than that of a normal hand gun. (Speed is slower, but projectile mass is higher).
For me, I used Industry standard AW(VP) pipes from SingaPlastics. I gave them a ring and they quoted me 20bar for the pipes and fittings. That's about 284PSI! It's not schedule 40, 80 or 120, but it is rather high pressure rated and pumping it to 100psi would have a safety margin of almost 3 times. The PVC classes my differ in your country but always be sure it is high pressure rated. If unsure, do not use it.
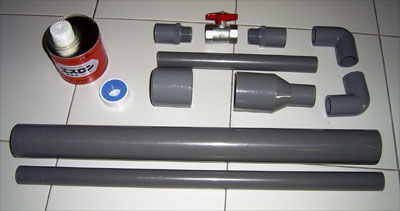 |
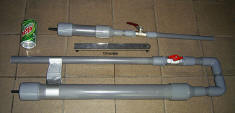
Materials Used
1. 1" PVC Elbow 90 degrees x 2 $2.00
2. 1" PVC Male adaptors x 2 $2.00
3. 2" PVC End Cap x 1 $2.00
4. 2" to 1" PVC Reducing coupler x1 $3.00
5. 2' of 2" Pressure rated PVC pipe $2.50
6. 3' of 1" Pressure rated PVC pipe $1.50
7. 1" Metal Ball Valve $8.00
8. High Strength PVC cement $5.50
9. Thread Seal tape $0.30
10. Car tire valve $2.00
Total Cost $28.80 |
Here is how I connected the parts together. The muzzle noise suppressor is optional. It can be made out of a 1" PVC coupler or a 2" to 1" PVC reducing coupler for more dramatic sound reduction. Drill holes at regular intervals.
To fit the tire valve through the end cap, drill a hole just big enough for it to go through. Use pliers to pull it through. It should have a good enough seal, otherwise, use a two part epoxy and firmly affix it there. You can use an electric pump or a manual operated pump to pump it up.
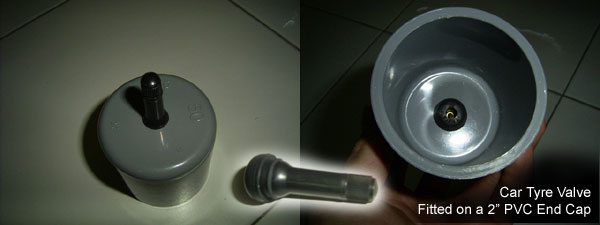
Here is how I fitted the valve.
This is the projectile stopper. This side is connected to the male adaptor at the ball valve. It is to stop the projectile from going further down into the valve. I drilled 2 holes at the side of the PVC pipe and fitted a 4mm thick solid copper wire through. It fits perfectly. You don't need to glue it because the male adaptor coupler will hold it in place. Note the thickness of the PVC pipe. This is thick walled pressure rated pipe, unlike those normal thin-walled PVC pipes. The pipe is wet because I washed it to get rid of the saw dust and drill dust.
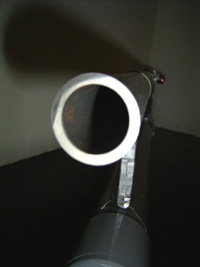
The cannon after gluing and fitting together. It is left to dry for 24 hours. I left out the silencer.
Projectiles
Unlike conventional firearms, this type of pneumatic air cannon has large barrel bores, due to the limited pressure. In conventional firearms, pressure is created by explosives, and can go up to several thousands of PSI. Air cannons however, are limited by ratings of the air-chamber, which is about a few hundred PSI maximum. Therefore, to provide more acceleration to the projectile, a larger barrel is needed. A larger barrel requires a larger projectile, which has a lot more surface area for the compressed air to 'push against'. (read the physics section for more detailed information) Long barrels are somewhat impractical and hard to handle.
A good projectile would have the following qualities:
-
Aerodynamic - Files far and fast
-
Not too heavy, but heavy enough to cause maximum destruction
-
Accurate - does not tumble in flight and travels straight
-
Easy to produce in mass quantities, and cheap in cost
Here are several projectiles I have tested and used.
1. Wooden rod wrapped with tape for a good fit
- Easy to make, flies fast but due to it's light weight does not go far. Cannot pierce objects.
2. Aluminum rod wrapped with tape for a good fit
- Easy to make, but not as cheap as wood. Flies fast and far and causes a lot of damage. Tumbles in flight. Cannot pierce objects.
3. Wooden rod wrapped with tape for a good fit with a 4mm copper rod hammered in one end
- Cheap and easy to make. Performance like wood but has the metal tip to pierce objects. Tip is not strong enough and bends at hard targets.
4. Bolt, nut and wood projectile (explained in detail more below)
- More complex to make. Performance is very good. Flies straight, far and causes good damage. Heavy and powerful.
5. Grapes. (fruit)
- Easy to use. Commendable performance. Too soft however for destruction and always self-destructs on impact causing a mess.
6. Copper/Steel rod wrapped with tape for a good fit
- Cheap and easy to make. Too heavy however, and does not go far, but causes large damage at close ranges. Big recoil.
7. Water. (Barrel filled with water)
- Cheap and easy to obtain. Has large recoil and spectacular performance. Good for watering plants.
8. Ice. (Frozen in similar barrel tube, and slid out with gentle warming on the sides)
- Cheap, but need to wait for water to freeze. Good performance, dangerous and evaporates after a while, 'clearing the evidence' of a projectile.
9. Potatoes. (Raw)
- Expensive on the long term. Reasonable performance and makes a mess upon impact.
10. Clay, play dough material.
- Good performance and causes quite a bit of damage.
11. Wet tissue paper
- Cheap and easy to make. Doesn't go far, but makes a big splat.
These projectiles have a diameter that of the barrel, (1 inch) and therefore gets slowed down a lot due to air resistance. Moreover, the projectiles have no piercing power due to the large diameter. There are several things which can be done for a good piercing projectile:
-
Make the projectile heavier. More weight gives the projectile more kinetic energy when it hits the target.
-
Make the projectile smaller in diameter. The smaller cross-sectional area means that the bomb has to move less material "out of the way" as it penetrates.
-
Make the projectile faster to increase its kinetic energy.
Option 1 and option 2 are tied together. Making the projectiles smaller in diameter is impossible otherwise it would not fit the barrel. Therefore, the whole projectile will be very heavy. Option 3 is difficult unless a bigger gun is use, or higher pressures in the air -chamber are used. However, there is a very clever solution to this problem. One can use a sabot. What is a sabot?
 " A sabot is a lightweight carrier in which a projectile of a smaller caliber is centered so as to permit firing the projectile within a larger-caliber weapon. The carrier fills the bore of the weapon from which the projectile is fired; it is normally discarded a short distance from the muzzle. " " A sabot is a lightweight carrier in which a projectile of a smaller caliber is centered so as to permit firing the projectile within a larger-caliber weapon. The carrier fills the bore of the weapon from which the projectile is fired; it is normally discarded a short distance from the muzzle. "
After doing some research (see HowStuffWorks for a good description on armor piercing projectiles), I came up with a simple design.
On the right you can see my sabot projectile design. The two grey lines is the barrel, the brown thing is the sabot and the grey object is the main projectile. The sequence shows what happens during firing. The sabot cradles the projectile, and accelerates it.
Once out of the barrel, air resistance pushes against the sabot (more surface area than projectile) and it falls apart, with the projectile accelerating away. The sabot should be made of a light material, while the projectile should be hard and heavy (Dense). This setup will provide the necessary kinetic energy to the projectile, and allows the use of dense metals with small surface areas. Projectiles can be longer as well.
For my design, I will be using balsa wood (very light but strong) for the sabot, and steel or brass for the projectile. Both steel and brass and very strong and are quite dense. Copper is denser, but is way too soft as a projectile. Lead is very dense, but is even softer than copper and cannot be used - lead would deform or disintegrates when it hits the target.
One material that is both extremely strong and extremely dense is depleted uranium. DU is the material of choice for penetrating weapons because of these properties. For example, the M829 is an armor-piercing "dart" fired from the cannon of an M1 tank. These 10-pound (4.5-kg) darts are 2 feet (61 cm) long, approximately 1 inch (2.5 cm) in diameter and leave the barrel of the tank's cannon traveling at over 1 mile (1.6 km) per second.
The dart has so much kinetic energy and is so strong that it is able to pierce the strongest armor plating. Depleted uranium is 1.7 times heavier than lead, and 2.4 times heavier than steel. Also, the Brinell hardness of U-238 is 2,400, which is just shy of tungsten at 2,570. Iron is 490. Depleted uranium alloyed with a small amount of titanium is even harder. Finally, depleted uranium burns. It is something like magnesium in this regard. If you heat uranium up in an oxygen environment (normal air), it will ignite and burn with an extremely intense flame. Once inside the target, burning uranium is another part of the projectile's destructive power. However, DU (U-238) is radioactive and has a half life of 4.5 billion years, and is not easily obtainable. So I will be using steel or brass.
06 Dec 2003
I have acquired a 2foot long, 6mm dia stainless steel rod. I got it cheap at a metal factory shop.Using a drill and a file, I grinded the tip of a short piece to a tapered point. I decided to go for a more 'bullet like' shape instead of a sharp tip dart shape. A more rounded tip would not be damaged as much as a sharp tip on impact and I would like to reuse the projectile. Stainless Steel is a pain in the neck to work with a took me a long time to grind it. Well I don't have a grinding wheel or angle grinder...
* Since then I have acquired more tools and can effectively shape more projectiles *
Test Firing
Although this gun is safely rated to 284psi (maximum pressure the pipes can handle,) is meant to be used only at 100psi (to maintain a large safety margin). However, to be safe and to check for leaks, it will be pressurized in steps of 10 psi and fired to see results. At 10psi, the projectile is already moving at a good speed and can cause substantial harm to people or objects!
 20psi Firing 20psi Firing
I made a projectile with a inch diameter wooden dowel several centimetres long. I wrapped tape around it for a good fit, and I hammered a 4mm thick copper rod through the centre for piercing power. I fired it at a 3mm thick plywood board at 20psi. The cannon is already imparting serious kinetic energy into the projectile already, even at these relatively low pressures. I wonder what will happen at 100psi...
Download a 270kb video of this shot.
20psi.wmv < Requires Windows media player to view.
50psi Firing
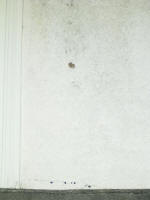
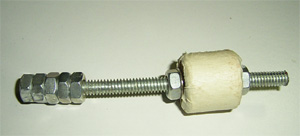 I made another projectile, this time, more sturdily built - the bolt nut and wood projectile. You can see in the picture. It's a 2cm long piece of wood, wrapped in masking tape for a good fit in the barrel. I drilled a hole through it and inserted a 6mm thick steel threaded rod and tightened it in place with nuts. For the head, I screwed 5 nuts to prevent the projectile from tumbling in flight and to add more weight for stability and power. It weighs 50g and is quite powerful. At 50psi, it went through the plywood (same as the 20psi shot above) easily. I decided to see what it would do to concrete. I pumped it to 50psi, fitting the projectile in and aimed it to a wall 20 metres away from where I was standing. I fired it. The recoil was not very noticeable, but the impact was. Almost instantly, it hit the wall, sending flakes of concrete flying and the projectile bounced back a good few metres. Upon further inspection, the projectile had blasted a 1 inch diameter crater on the wall and the threaded rod part of the projectile was slightly bent. I couldn't get a good photo (wall was too high up) but it looks like that from afar (picture on the right, click to enlarge). I have no way of measuring the speed of the projectile, but clearly, the gun is imparting quite serious kinetic energy into the projectile. I'll need a chronograph or similar and I'll find a way to acquire one. A better projectile has to be built. (One that does not bend...) I made another projectile, this time, more sturdily built - the bolt nut and wood projectile. You can see in the picture. It's a 2cm long piece of wood, wrapped in masking tape for a good fit in the barrel. I drilled a hole through it and inserted a 6mm thick steel threaded rod and tightened it in place with nuts. For the head, I screwed 5 nuts to prevent the projectile from tumbling in flight and to add more weight for stability and power. It weighs 50g and is quite powerful. At 50psi, it went through the plywood (same as the 20psi shot above) easily. I decided to see what it would do to concrete. I pumped it to 50psi, fitting the projectile in and aimed it to a wall 20 metres away from where I was standing. I fired it. The recoil was not very noticeable, but the impact was. Almost instantly, it hit the wall, sending flakes of concrete flying and the projectile bounced back a good few metres. Upon further inspection, the projectile had blasted a 1 inch diameter crater on the wall and the threaded rod part of the projectile was slightly bent. I couldn't get a good photo (wall was too high up) but it looks like that from afar (picture on the right, click to enlarge). I have no way of measuring the speed of the projectile, but clearly, the gun is imparting quite serious kinetic energy into the projectile. I'll need a chronograph or similar and I'll find a way to acquire one. A better projectile has to be built. (One that does not bend...)
I tried a sub 50psi firing at a telephone directory. The projectile (same as above) punched though around 400 pages (200 sheets of paper) before giving up and stopping. Here's a video of it firing: tfi_50psi_book.wmv < Requires Windows media player to view.
Physics
Simply put, a pneumatic gun has two main chambers, the air tank and the barrel, separated by an air-tight valve. The air tank contains the compressed air, while the barrel contains the projectile, where it is able to accelerate. When the valve is open, the air pressure difference between the air tank and the normal atmosphere makes the compressed air from the air tank push against the projectile, accelerating it down the barrel. Normal atmosphere pressure at sea level is around 14.7 PSI (pounds per square inch). Since most air compressors and meters usually take the difference between the atmosphere and the pressurized chamber, you can safely say a chamber filled with compressed air reading 100PSI on the gauge is actually 114.7 PSI.
It is possible to calculate the maximum projectile speed attainable with a certain amount of pressure. In this example, we will be using the measurements for my TFI cannon pumped to 100 PSI with a 50g projectile.
100 PSI = 689476pa (Pascals) , 50g = 0.05kg
Air Tank Dimensions: 2"dia * 24" > 5.08cm dia * 60.96cm
Barrel Dimensions: 1"dia * 24" > 2.54cm dia * 60.96cm
The barrel cross section is therefore Pi * r2 = 0.7854"2
Using Pi * r2 * h, we can calculate the volume of the chambers:
Air Tank Volume = 75.3982"3 > 0.001236m3
Barrel Volume = 18.8496"3 > 0.0003089m3
Total Volume = 94.2476"3 > 0.001545m3
When the projectile is at the start of the barrel, the pressure is 100 PSI. However, when the valve opens and the projectile begins to move all the way to the end of the barrel, the pressure drops as there is now more volume for the original compressed air in the air tank.
Since the amount of air does not change, We can use the formula P1 * V1 = P2 * V2
100 PSI * Air Tank Volume = P2 * Total Volume
Therefore, P2 = 80 PSI, and there is a pressure drop of 20 PSI
Knowing these values, we can calculate the force acting on the projectile throughout the barrel.
The force acting on projectile = Pressure * Area
At 100 PSI (start of barrel), 100 * 0.7854"2 = 78.54lb = 357N of force
At 80 PSI (end of barrel), 80 * 0.7854"2 = 62.832lb = 285.6N of force
The average force acting on the projectile in the barrel is therefore (357+285.6)/2 = 321.3N
When there is force and mass, there is acceleration. And where there's A LOT of force, there is a lot of acceleration!
Using the formula F=ma,
321.3 = 0.05 * a
a = 6426ms-2 (That is a lot of acceleration!)
And using the formula d = 0.5at2,
0.6069 metres = 0.5 * 6426 * t2
Therefore, t = 0.01374 = Time taken for the projectile to travel out of the barrel
Using all these values, we are thus able to calculate the maximum projectile speed as well as the total kinetic output:
Velocity = Acceleration * Time, Therefore
v = 6426 * 0.01374
Velocity = 88.3169ms-1 > 317.94km/h!
And because K.E. = 0.5mv2,
Energy = 0.5 * 0.05 * 88.31692
Energy = ~195Joules!
That is a very high output energy! Of course with a lighter projectile, faster speeds are attainable. For example, changing the 50g projectile to a 10g projectile would yield the same energy output, but with a projectile speed of 197.5m/s! Breaking the speed of sound would be quite impossible with this setup as the speed of sound at 0'C is around 331m/s. The Speed of sound changes at different temperatures and can be calculated by this formula:
vspeed-of-sound-in-air = 331.4 + 0.6TCelcius m/s
The calculations provide a idea of the maximum theoretical velocity, which is often lower in real life and the calculations do not involve factors such as friction, suck back effect, valve opening time etc. Efficiency of the air gun can be greatly improved like a fast opening valves, or a smooth projectile with little friction. Other factors include the air tank volume, and barrel length. As can be seen from the calculations, the more air tank volume versus the barrel volume, the less pressure drop as the projectile accelerates, and therefore more average force. However, the longer the barrel, the longer the time the projectile will be accelerated and therefore faster speeds. However, there is a maximum effective length of the barrel (before friction and suck back effect takes over) and it can be calculated. If the pressure drops to the same as the atmospheric pressure, there will be no force applied to the projectile. However, a maximum effective barrel length would be very long and these things would happen:
1. Gun with extremely long barrel (not aesthetic)
2. Barrel may bend (PVC bends if too long)
3. Difficult to transport and move around
Rostislav Persion's Pneumatic Cannon 002's page has more excellent information about this topic, as well as a cannon simulator. Do check out some of his nice cannons.
* Unfortunately he has since removed his site *
High Speed Photography
Introduction
High Speed Photography is important in understanding projectile flight and effects of various factors such as pressure, air resistance, etcetera, and these high-speed photographs can reveal what happens during impact and the choice of different projectiles and targets. Visit the High Speed Photography page for more information on the triggers and construction of them.
Mechanical Wire Trigger
Probably the simplest way of triggering, using a mechanical wire trigger. A wire is places in front of the projectile. When the projectile hits it, it will cause the wire to bend, making it in contact with another piece of wire triggering a flash to capture the event. This method works fine in capturing the projectile, but the wire will be visible in the photograph.
1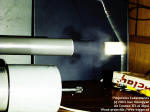 2 2 3 3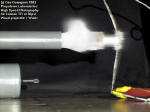 4 4 4th December 2003 4th December 2003
These shots are of the projectile exiting air cannon TFI with the air tank pumped to 30psi. The first two pictures show a wooden projectile exiting the barrel. The photos have been the contrast digitally enhanced for better visibility of the 'smoke trail' which is actually condensation of water vapour. For the last two pictures, water was poured into the barrel, before a tight fitting wood projectile (wrapped in duct tape) was stuffed in. In the fourth picture especially, one can see how water spreads out after it exits the barrel.
Plate Contact Trigger
A contact trigger is something like a big metallic switch, which is connected to a flash unit, and triggers it when in contact with each other. Basically, there are two conductive surfaces, separated by a small distance, and come in contact when something is dropped on it, or hits it.
1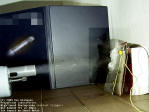 2 2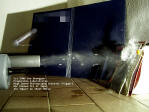 8th December 2003 8th December 2003
Shots 1 & 2: Frozen water impacts on sheet metal with a contact trigger. The yellow and black wires running out are to the flash unit. Notice the vapour trial, small fragments of ice leaving the barrel, and the main collision. I froze water in a pipe (same as the barrel) and broke it into 2 inch pieces to fire. Images have been digitally contrasted for better viewing. Click Pictures to enlarge. The cannon is pressurized to 30psi.
Others
 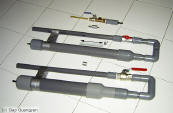
Due to the overwhelming popularity of the air cannon among my classmates, many have requested me to build one for them. I am assuming they are using it for education purposes... anyway. The first photo shows a small air gun I made. It has a small 1.5" dia air tank with a 1/2" dia x 1' long barrel. It's still rather powerful, but much lighter and more compact.
The second photo shows 3 cannons, the original one (middle), a brass/PVC one and a larger one (bottom). The brass one I made to withstand extremely high pressures (600psi.. limited only by the valve). The back part is PVC for now, and I will change it to brass or steel soon. The bottom one is a bigger version of air cannon tfi. It has a large 2.5" air tank, as well as a better ball valve with a Huge opening. About 50% more opening than the first one. This allows for a quite pressure release. I sold it to my friend. I am thinking of making a 5' long air gun. Stay tuned.
Back to main page
(c) Gao Guangyan 2011
Contact: loneoceans [at] gmail [dot] com |