Acetone Peroxide
Standard Synthesis
3 Dec 2005
Introduction
Acetone Peroxide (AP), also known as peroxyacetone, is a powerful explosive (high explosive), and was discovered in 1895 by R. Wolffenstein.
Acetone Peroxide can be made from common easily obtainable items - Acetone, Hydrogen Peroxide and a catalyst such as sulphuric acid. AP is usually used as a primary explosive (detonator) and never used as a main filler explosive, due to it's sensitivity. AP will easily detonate in contact with fire, heat or friction. When ignited in small amounts, it creates a large fireball. When confined or large amounts are used, it detonates without any flame. AP is one of the most friction sensitive explosive known, and great care is needed to handle this explosive. Furthermore, as with other explosive peroxides, AP is very volatile. If left 10 days at RTP, almost 50% of the sample will completely volatize. Due to it's vaporizable nature, it would have to be used almost immediately after manufacture. Mixtures of R.D.X. and Picric acid with acetone peroxide are reported to be used between primary explosive and the base charge. Mixtures such as picric acid / acetone peroxide (40/60) or similar mixtures with R.D.X. and P.E.T.N. will give explosives greatly increased resistance to impact without losing much performance. These dried crystals would be ready to load into detonators for immediate use as the storage stability is not very good.
AP has several different forms, di-, tri- and tetra peroxides. Power and stability increases with size of molecule, meaning that tetrameric peroxide is most powerful and stable, while dimeric is the opposite. The ratios of these isomers depend on reaction conditions during synthesis. Many have been killed or severely injured while trying to synthesis AP. The most common error is that of temperature. When making the tricycloacetone peroxide, temperature must be less than 10°C at all times, otherwise dicycloacetone peroxide may be formed, which is extremely unstable and so sensitive that it has practically no uses at all - dicycloacetone peroxide has been known to explode spontaneously.
AP burns quickly with a large orange fireball, in unconfined quantities less than 2 - 3 gram. More than this amount will usually lead to detonation. The extreme shock, heat and friction sensitivity are due to the instability of the molecule, and the large number of bonds broken per molecule when AP disintegrates.
- IUPAC name: 3,3,6,6,9,9-hexamethyl-1,2,4,5,7,8-hexaoxacyclononane
- Formula: C9H18O6
- CAS number: 17088-37-8
- Molecular weight: 222.24 g/mol
- Density: 1.18g/cc
- Melting Point: 91
- Shock sensitivity: 0.3NM
- Detonation Velocity: 3750m/s at 0.92g/cc, 5300m/s at 1.18g/cc
Reactions that will occur are the formation of AP, and the oxidation that occurs when burning
3(CH3)2CO
+ 3H2O2 = H+
→ C9H18O6
+ 3H2O
2 C9H18O6
+ 21 O2→ 18 H2O + 18 CO2
The synthesis outlined here is relatively easy to do. Information provided for educational purposes only.
Disclaimer
The experiments outline here are for educational purposes; scientific research only. Do not attempt any such experiments. You are responsible for what you do.
Materials and Apparatus
Materials and Apparatus Required
-
97% Concentrated Sulphuric Acid (H2SO4) (l)
-
30% Hydrogen Peroxide (H2O2) (aq)
-
Distilled Water (H2O) (l)
-
Sodium Hydrogen Carbonate (Bicarbonate) (NaHCO3) (s)
-
Acetone (CH3)2CO (l)
-
10ml Measuring Pipette
-
Eye dropper or really small pipette
-
Glass Stirring Rod
-
2 Glass beakers
-
-10 to 110C thermometer
-
Filter paper, filter funnel, conical flask
Different amounts of chemicals are used. The table below lists the amount of chemicals needed.
| Amount of AP |
Acetone |
Hydrogen Peroxide (30%) |
Sulphuric Acid (80-100%) |
| 10g |
10ml |
11ml |
2ml |
| 25g |
25ml |
27.5ml |
5ml |
| 50g |
50ml |
55ml |
8ml |
* It is always better to add a bit excess Hydrogen peroxide. (from thugsta785's AP synthesis experiments)
* Sulphuric acid is used as a catalyst, however, other acids can be used. Citric acid and hydrochloric acid can be used. Temperature rise is more significant though when sulphuric acid is used.
* 3% hydrogen peroxide can be used too, if 30% hydrogen peroxide cannot be obtained. However, yields might be lower. Measures must be adjusted. Same goes with the acid.
Synthesis
Here, a 10g synthesis of acetone peroxide will be outlined.
Firstly, 11ml of 30% Hydrogen Peroxide is pipetted into 10ml of Acetone in a small 100ml conical flask. A beaker can be used but I chose to use a small conical flask to reduce acetone evaporating. This was then cooled in a salt ice bath until the temperature was around 5C. Secondly, 2ml of Sulphuric Acid was added. (It is recommended to cool the acid before adding to reduce temperature rise.) This is a critical step. The acid has to be added slowly drop wise. Do Not let the temperature rise to over 10C, otherwise there will be formation of the unstable dicyclo iosmer. Temperature is held between 0 - 10C. Constantly stir solution. It's alright if the solution is yellowish. When all acid is in, the solution is stirred for another few minutes. You will see that white precipitate starts to form already. Another plus point for the conical flask is that it's easier to mix by shaking.
After that, the flask was wrapped up in plastic and left in the fridge. Temperature should be kept between 0-10C. It is important to cover it properly if putting it in the fridge.. Formation of crystals should be done in 6 hours with high concentrations of hydrogen peroxide. However, if 3% hydrogen peroxide is used, formation will take a longer time. In either case, 24 hours will ensure that almost all the AP will crystallize. If everything is done right, you will see white precipitate at the bottom of the beaker and some will be floating on the surface.
Once crystallization is complete, the solution was poured to a larger beaker (from my small conical flask), and water was used to wash the remaining AP left on the inside of the conical flask and poured to the large beaker. 100ml of sodium bicarbonate solution was poured in the beaker. There will be a lot of fizz, so add slowly to prevent overflowing. The AP crystals may rise to the top. More sodium bicarbonate is added to neutralize the solution. The solution is then filtered. The residue is filtered with more distilled water and once more with sodium bicarbonate solution to neutralize the remaining acid, and washed finally with water again. Ensure that it's neutral, otherwise continue washing. Without acid present, AP will be much more stable, and therefore it is important to wash thoroughly.
The AP is then spread out on the filter paper and left to dry. You will notice that AP has a funny 'sweet' smell. Total yield should be around 8 grams of white salt like crystals.

Above is a tiny pile of acetone peroxide set off on a solid metal plate, ignited by a high voltage electrical arc. Click to enlarge.
*The pile of acetone peroxide was actually still very damp when ignited!
Apple Explosion
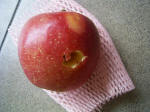

Many have wondered what happens when an apple is blown up. This experiment is carried out to answer this question and to satisfy all the curious minds out there. This information is provided for educational purposes only and should not be carried out.

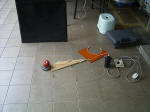
A cheap red apple was bought from the grocery stall. This is a standard red apple and was picked at random. About 1+g of acetone peroxide is inserted into a plastic tube (right). The plastic tube is made from a strip of transparency rolled up (other plastic sheets should work too). Plastic is used to water-proof the AP from the apple juice. The tube is taped with masking tape (black in the diagram). One end is wrapped and covered thickly with more tape. Around 1g of AP was inserted into it, and the igniter was inserted. The igniter consists of two insulated wires, with the ends cut stripped. This two ends are separated by a bit of tape, and inserted into the explosive. Everything else is taped up with masking tape. Finally, aluminium tape was used to wrap everything again to make it more waterproof (of course any type of water-proof tape will work). Besides, aluminum tape makes it look nice. The second photo shows the explosive.
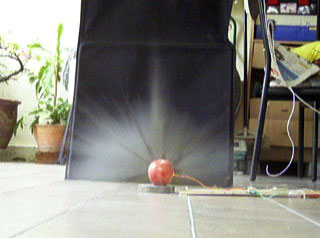
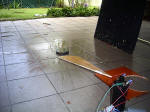
Using a big (10mm) drill bit, a hole was bored through the apple (photo 3). The charge is inserted (photo 4), and the apple is set on a solid metal plate. Ignition is done using a high voltage electrical arc from my ignition coil. Two cameras were set up about 3 metres away, set to video mode, and the switch was flipped. Instantly the apple literally exploded, sending apple juice and pulp all over the place. The shockwave could be felt from a few metres away, followed by the splattering of apple juice. One of the cameras got knocked to the side by a piece of apple (one was on a mini tripod, the other was balancing on a plastic container). The photo on the left shows point of detonation. It's a captured frame from a video. No complete piece of apple was left - Everything was pulverized. The last photo in the above set shows the aftermath. Note the radiating blast marks on the floor (juice), and the apple pieces all over the place. The whole place was covered with a thin layer of apple juice.
From the experiment and video footage, several conclusions can be drawn. Firstly, the apple flesh is mostly pulverized, and did not shatter, but rather disintegrated into pulp. This is evident from the video capture. A radial blast pattern shows that the apple disintegrated quite uniformly. However, this also caused clean-up to be difficult as rather than picking up apple pieces, the juice and the pulp had to be cleaned up (mostly juice). Secondly, it is also important to place camera behind a screen for protection. Third, some parts of the skin were actually found intact, showing that the either the shockwave was not strong enough to tear apart the skin into tiny pieces, or perhaps the skin has a rather good tensile strength, or that the flesh absorbed most of the blast before hitting the skin.
Unfortunately, I do not have a high-speed camera, so a standard video will suffice for now:
Video of the apple
Click here to download. (400kb, wmv format, requires Window Media Player)
Video from two cameras. The buzzing sound is the high voltage arc.
Originally 6th Sept2004
Back to main page
(c) Gao Guangyan 2011
Contact: loneoceans [at] gmail [dot] com |