|
Marx Generator
"Lightning at home!"
Index
Safety
|
A Marx Generator is an
extremely dangerous High-Voltage pulsed power voltage
multiplier device. It CAN kill!
Firstly, make sure that
no one can come in contact with this - particularly curious
onlookers, and yourself. Separating the potential victims from
any possible contact with the high voltage is really the only
foolproof way of protecting against fools or the unaware.
People not familiar with high voltage phenomena can be
incredibly naive. Always keep a safe distance from your Marx
Generator!
A Marx generator deals with already high voltages, and
Multiplies it to an incredibly high level. 100,000 volts will
jump about 11cm and 1 million volts will jump over 1 metre!
This distance occasionally varies unpredictably with humidity.
1kV jumps about 1.1mm. Don't forget that the Marx
generator is a pulsed power device and stores its high voltage
charges in capacitors. This makes it extremely dangerous!
Always remember to discharge all capacitors with a proper
discharge probe before making adjustments.
Electrical discharges in air are a producer of ozone which may
be a health hazard. Ozone in large amounts is dangerous. The
discharges also produce a lot of harmful UV radiation!
Protective eye-wear is recommended for extended periods of
time. Ear protection is also recommended. The discharges also
produce significant Radio Frequency Interference (RFI)...
Prevention is better can
cure. :) Be safe! |
Introduction
|
Do you like the idea of
tesla coils and other high-voltage sparking stuff, but don't
have the time, money or patience to build something that
elaborate? If cheap loud and long sparks are your aim, a Marx
generator delivers them with excellent simplicity. Just a
slack handful of bits and pieces will build you a respectable
noise and light show that can be powered nicely with a flyback
or similar source of kilo-voltage DC. Simply said, a small
Marx generator is a fun project that can make big, fat, long,
noisy sparks, and can be built very quickly and cheaply.
Basically, a Marx
Generator is a simple way to generate lots of voltage. A Marx
generator is a type of voltage multiplier. It isn't a
new idea - charge up a stack of capacitors in parallel,
discharge them in series. When you use high voltage capacitors
and spark gap, the resulting sparks are quite impressive.
Unlike Cockcroft-Walton multipliers, the Marx Generator needs
no diodes, and only uses one cap per stage. This reduces their
cost enormously, at the expense of the mechanical complexity
of the spark gaps.
Marx generators make excellent lightening simulators. They are
also very hostile to surrounding equipment, as my pathetic
power supply well knows. (It blew it up after a few
minutes...) Be careful they can bite very hard too. Always
remember to discharge each capacitor carefully before
handling it. These caps can store a serious amount of energy!
How it works.
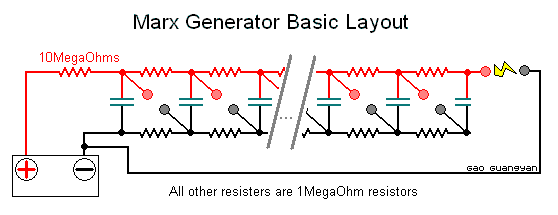
The Marx generator consists of an array of
resistors, capacitors and spark gaps arranged as above
The capacitors (in
green), are charged up in parallel via the 1M (one megohm)
resistors, so they each become charged to the input voltage
from the high voltage DC power supply unit (with a 10M
resistor for current limiting and protection). When the first
(leftmost) spark gap breaks down, the voltage across the next
stage increases, causing it to break down, and so on for all
the other gaps. When all gaps have broken down, the low
impedance of the ionised air in the sparks effectively
connects all the charged capacitors in series, multiplying the
input voltage by the number of capacitors (or stage). The
ionised air path has sufficiently low resistance that the
charge resistors don't have any significant effect. Basically,
a smart way of charging capacitors in parallel, and
discharging them in series, creating extremely high voltages.
The 10MegaOhm resistor also has a ballasting effect. This is
needed to avoid a continuous arc forming across the first gap
after it fires (this prevents further firing). The value will
depend on the type of power supply used. High values will
reduce the maximum spark repetition rate, so you may be able
to get more 'bangs per second' by reducing the resistor value.
Although it is possible to make a Marx generator with just an
array of resistors, capacitors and spark gaps, it can be hard
to make it fire reliably, as it will depend on the breakdown
voltage of the spark gaps, and there can be a fine line
between not firing and firing before all the capacitors are
fully charged. One solution is to initiate the breakdown of
the first gap mechanically, e.g. by waving a suitably
insulated screwdriver between the electrodes, or pushing the
first gap contacts together with an insulator.
Componets.
You only need...
1. Capacitors
2. Resistors
3. Solder, Wires, etc...
4. Power supply unit
The most important thing
is to make sure that the components are suitable for the input
voltage used. This includes the resistors - normal 1/8 or 1/4
watt carbon or metal film resistors are not suitable for high
voltage uses like this. Larger (1 or 2 watt) carbon resistors,
or high-voltage metal glaze resistors should be used.
Alternatively several standard resistors can be used in
series, calculated such that each resistor sees no more than
its voltage rating (typically about 500V). For example, ten
100K 1/4 watt resistors could be used in place of each 1M HV
resistor. The value of the 1M resistors is not too critical -
higher values will increase recharge time, lower values will
increase losses as some of the spark discharge leaks back
through the resistor chain, especially with lower value
capacitors.
Capacitors should ideally be ceramic types, as these are best
suited to the fast pulses in a Marx generator - polypropylene
pulse-rated caps would probably also work well, but are more
expensive, and harder to find with high voltage ratings. Use
the highest voltage types you can find. Larger values will
give fatter sparks, but take longer to recharge... You can
often run these in excess of their rated voltage, but
obviously this runs an increased failure risk.
An input voltage of about 4-8KV is recommended. Above this,
many problems will detract from the 'quick and dirty'
approach, requiring much greater care in construction to
reduce corona losses from sharp edges, multiple series
resistors would be needed, and the capacitors will be harder
to find. The high impedance of the charging network mean that
corona losses can significantly degrade performance above
about 5-6KV unless care is taken to avoid any sharp edges -
e.g. by filing the wire ends and joints smooth.. soldering
blobs of solder at sharp parts ... potting the whole setup in
insulation...
A simple design requires a low-current source of high voltage
DC in the range 4-8KV. Small, low-current HV supplies from
things like ionisers, photocopiers and laser printers should
be suitable. The number of stages you use will determine the
output voltage, and hence spark length. |
Marx Generator 1
|
Monday, 27th October 2003.
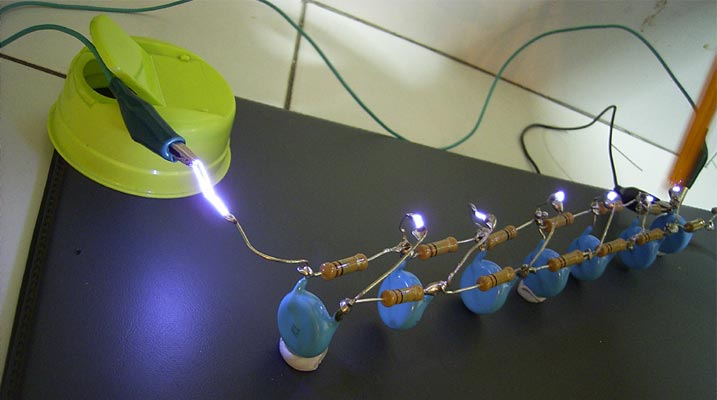
This is my first Marx Generator. Marx
Generator 1, model 1. :-)

It's a bunch of wires,
resistors, and capacitors soldered up together. Very simple.
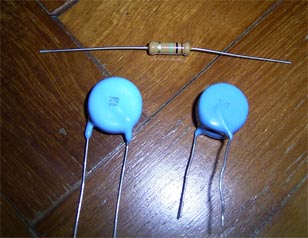
These are 1nF(label on the cap) or 810pF (labeled at the shop
where i got them from) (Quite close values anyway) 15kV
ceramic caps. They have a nice insulation and generally should
be good caps. It's a pity I only got 7 of them. All resistors
are 1W 1MegaOhm resistors. At these lower voltages, arc-over
should not be a problem... I hope.
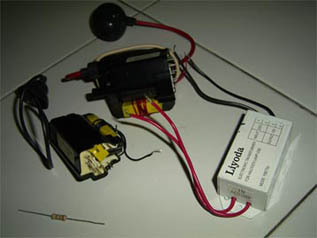
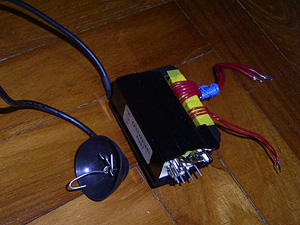
Here are the caps,
resistor and power supply. The resistor is a 1W 1M resistor.
The cap on the left is the 15kV 810pF cap (the one I am using)
and the cap on the right is a 30kV 510pF cap. I am using the
50W Liyoda electronic halogen transformer (read more about
flyback driver circuits at my
flyback page here) to drive the flyback which drives the
Marx generator. I am using the small flyback (the one closer
to the resistor). It's from a black and white TV and with my
wimpy set up, it outputs around 5kV at around 10mA DC
(estimated. I need a HV probe..). Perhaps even less.... i need
a better power supply! My caps are definitely overrated (at
15kV!) , but that is not a bad thing :).
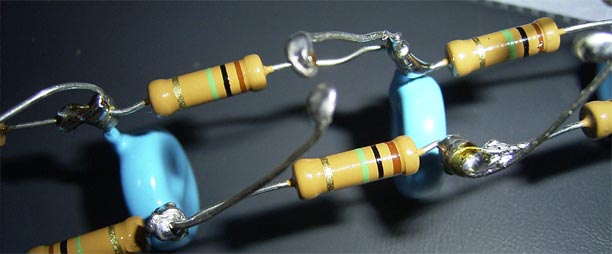
Here is a close-up of
the construction effort. Notic the excess solder usage and the
loop-surface-blob gaps. Although not important for correct
operation, they are a nice professional touch, making
everything more reliable and repeatable when measured. It
looks nicer than bent bits of wire too. This
all-smooth-surface construction proves to be very useful :)
Gap spacing and charging
current are important. The gaps should all trigger at once. In
practice the first gap fires and the over-voltage avalanches
up the stack. Therefore, I made all the gaps above the first
wider, and controlled the trigger voltage from the first gap.
If your charging current is too high the first gap may light
continuously. This was quite a problem for me, but for now,
I'm using a piece of plastic to trigger the first gap...
My current setup (model
1) has 7 stages with an estimated 4kV+- per stage, equates to
about 30kV output. Which each cap storing 810pF, and total
capacitor charged at 30kV, the whole discharge is 115.7pF at
30kV... 1/2 x 0.0000000001157 x 30000^2 = 0.05207Joules per
bang.. not much actually, but produces large healthy 3cm arcs
as can be seen in the photo below! First light! It works :D.
It's loud, nasty, and really awesome. The blurry orange object
on the right is a piece of plastic i used to trigger the spark
gap. Notice how bright the arcs are :D
Unfortunately, my 50W
power supply unit died soon after this photo was taken :(. The
flyback, however, was unharmed. That's all for now, until I
get a new power supply. I am considering adding more stages to
it. |
Marx Generator 1
Updated
|
Monday, 15th March 2004.
Due to the sudden death of my flyback
driver PSU, I had to discontinue my high voltage flyback
experiments, and this lead me unable to charge up the marx
generators capacitors in a suitable way... until now...
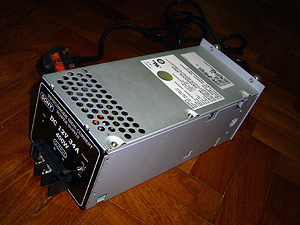
I have recently acquired a SONY brand
Switch Mode Power Supply unit. 12V at 34A! This is MORE than
enough power for driving my flyback! (For more information on
the flyback charging circuit, check out my
flyback driver page). I
used a small flyback from a black and white TV... it's a
'modern' type flyback and is already rectified (outputting
DC). Everything has remained the same as Marx Generator 1, a
new higher voltage charging supply is used!
So I plugged it in...
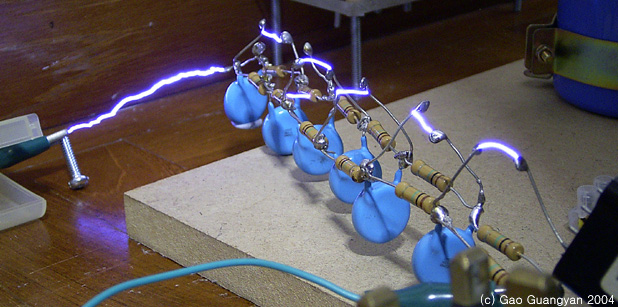
Much better! The voltage
is MUCH too high! This is about the maximum I can open the
spark gaps.. more than that the resistors start arcing over,
the capacitors start arcing over and .... well just about
everything arcs over... the spark gaps are around 1.3cm...
which suggests around 15kV charge in the capacitors...
15x7stages yields 105kV! That's about 0.56J per bang. Very
loud and bright. It fires itself about twice a second. In the
photo, the main gap is 7cm, but the arc can jump a 10cm gap or
more! A lot of corona is evident (From the hissing sound and
the large amounts of ozone produced), and a lot of energy is
wasted there. I think I need higher voltage capacitors...
Immersing it in oil would reduce much of the insulation
problems, but I have yet to tried it.
This is a success so
far!
|
Marx
Generator Index Page
Gao Guangyan. LoneOceans.com
Danger! High Voltage! Do not attempt at home. |
