|
Loneoceans Jet Engine 1
|
Index
WARNING
/Disclaimer: Working with turbine jet engines are Very
Dangerous, and deals with the handling of highly flammable
gasses and liquids, as well as extremely high rotational speeds
of the turbine. There is a great fire hazard and a leak could
cause catastrophic explosions. Furthermore, the turbine can
easily spin out of control and explode, sending lethal shrapnel
all over the place. Information here is for educational
purposes; project similar to this should only be carried out by
professionals.
I have always been interested and fascinated with engines of all
types. I remember, when I was young, that I was so fascinated
with airplane turbine jets that I walked dangerously close to
the engines, only to be stopped by my parents. (on those planes
where you alight from a bus to walk up a staircase to the plane;
not those planes with the walkways from the terminals)
I've also been taking apart lawnmowers and studying their
engines, and trying to get them started. Of course nothing beats a
jet turbine spinning at hundreds of thousands of RPMs. Many
consider just the sound of the turbine spooling up to great
speeds incomparable to anything else. Since the creation of the
first working model of a full-scale aircraft turbojet engine by
Frank Whittle and Hans Von Ohain, flight and aviation had been
revolutionized. This creation proved to be almost as
revolutionary as the Wright brothers’ first flight itself, as
planes began to take to the air with higher efficiencies and
greater speeds than ever before. Today, we see the descendants
of the original jet engine, namely the ramjet, pulsejet,
scramjet, turborocket and many more.
However, building a professional turbine is no simple task.
Construction of one involves precision making and balancing of
the compressor blades, as well as the use of extremely tough and
expensive materials. This is well beyond what I could ever do
with basic home tools. Nevertheless, with some innovative
thinking, some good welding and metalworking skills, the
construction of a simple amateur jet engine is actually not
complicated.
After the construction of my latest project, the
4" 3kW
Tesla Coil 2, it was time to embark on another
project. And thus I finally decided to construct a jet engine.
Since I had to do a project for my school anyway, I though I
might as well do this as my school project. Besides, if my
proposal gets approved, I might be granted access to a good
metal-working lab and even get some funding! In any case,
whether my proposal is accepted, or not, I will be constructing
a jet engine.
The page will document the construction as well as testing and
improvements of the Jet Engine.
|
|
Project Introduction
January 2005
On the 26th Jan
2005, I wrote a proposal and submitted it in for my school's
compulsory research education programme. Some of you might know
of the Coil gun project I did last year. Do check it out
here.
I decided to do something different this year.
The proposal was "to
construct a working model of a turbojet engine, based on one of
the simpler designs of jet engines, without the use of extremely
exotic materials. In this stage, we aim to understand the
concepts of how the turbojet engine works, as well as experience
the difficulties and limitations that Frank Whittle and Hans Von
Ohain faced during the construction of their first model of the
turbojet engine. Possible deigns include using a centrifugal
rotor (perhaps from a turbocharger) as the compressor blades
instead of an axial rotor, and the model will run on either
liquid petroleum gas or a liquid fuel such as kerosene."
In addition, "After
the model is completed, we aim to study it and identify the
areas of inefficiencies, based on how well the engine works in
terms of net thrust generated. Finally, solutions on how the
model can be improved would be proposed, and possibly made as
improvements to the model. The advantages, practicality,
feasibility, limitations as well as the purpose of each
suggestion would be explored, thus identifying the best
solution.
"
As with last year, we are not permitted to work individually, so
I decided to work with Ong Woo Han again. We managed to find a
teacher who was interested in our project and he is non other
than Mr. David Court. He said that it might be possible for him
to find a mentor for us. I'm currently not sure if our project
proposal will be accepted but we shall see. Suppose it doesn't
get accepted, I will still build a jet engine on my own.
7th Jan 2005
After some discussing, our project proposal was accepted, and
Mr. Court (our teacher advisor) got us into this programme
called the "Science Mentorship Programme (SMP)", which some of
you might be familiar with. (Same programme as last year).
Apparently, a new branch of SMP was created this year, called
the "NUS-EMP", or National University of Singapore - Engineering
Mentorship Programme. They haven't exactly found a mentor for us
yet, but we are hopeful. We need a good metal-working lab as I
do not have suitable equipment for metal-working in my home.
Perhaps we can be affiliated with Pratt & Whitney, or maybe
Boeing. That'll be cool! The Launch of the Science Mentorship
Programme was on 4th Jan 2005 Friday at Nanyang Polytechnic.
|
Project Log
|
Project Log
Introduction
The project log will document the construction and testing of
the jet engine.
|
|
|
|
4th Feb 2005
Today was the
launch of the Science Mentorship Programme (SMP) at Nanyang
Polytechnic. We are placed into the NUS EMP category. (National
University of Singapore - Engineering Mentorship Programme) |
|
14th Feb 2005, Monday
I discovered a junk
shop which had a Turbo Charger! It was a used reconstructed one
but it looked in reasonable shape. The blades were however,
stuck, but I suspected that it was filled with dirt. I bought it
for $45 and lugged it back home. It's a good buy considering
that a new turbocharger would at least a thousand dollars,
perhaps even more!
Due to busy school, I could only do a quick disassembly to find
out what happened, and then pop it back on. I guess I'll have to
clean it another day. Below are some photos I took.


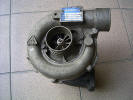
It's a KKK brand turbo charger. When I opened it up, lots of
dirt came out. Now the blades turn a bit better. I seriously
need to clean this up but I'll need to find time for that.
I might just use this turbo charger to build my OWN jet engine,
separate from the SMP jet engine. As such, I will name this
project the GXR-1 jet engine. GXR stands for: Guangyan
eXperimental Research 1 - Jet Engine. I'm calling it that
because it'll be easier to refer to the project, and besides, it
sounds nice. Until next time! |
|
|
|


